Showing posts with label communication. Show all posts

Tuesday 9 June 2020

How to use Microsoft Teams Live Events

What are Teams Live Events?

At its simplest, Teams Live Events enables you to stream live video and digital content to audiences of up to 10,000 attendees.

Teams Live Events is designed for situations where the few are presenting to the many — contrasting with standard Teams Meetings which are designed for interactive and collaborative participation from many members of the meeting.

Ideal use cases for Teams Live Events include webinars, product demos, corporate presentations and conferences.

Additional features which add to the user experience include:

Live Q&A
Post-event video downloads
Attendee engagement report
Live captions and translation
Transcripts

With Teams Live Events, you can assign members of your event team as producers or presenters. With each member of the team using a different device, you can coordinate seamless and engaging online events from anywhere in the world at any time — regardless of where your presenters are based.

Do I need a Teams Live Event Licence?

You don’t need a specific licence, however you will need one of the Office 365 E1, E3, E5, A3 or A5 licences which include Microsoft Teams. The person creating the event must be a member of the organisation and can’t be a guest or from another organisation. They will also need to have an Exchange Online mailbox.

You may need to ask your IT administrator to use the Microsoft Teams Admin Centre to grant you permissions to create live events in Microsoft Teams and enable any associated permissions.

Teams Live Events vs Skype Meeting Broadcast

Teams Live Events is the new and improved version of Skype Meeting Broadcast, however there are a number of differences – which we’ll only briefly touch on here as Teams will be replacing Skype for Business on 31st July 2021.

For example, in Teams Live Events you can screenshare, which wasn’t possible with Skype Meeting Broadcast and Live Events also supports dial-in presenters.

Teams also supports external encoders and hardware for those who want to produce their events with external production tools and media mixers etc.

Event Team Roles and Responsibilities

Before we guide you through setting up you Live Event, you need to understand the four key roles involved in running a Teams Live Event properly:

Organiser
Producer
Presenter(s)
Attendees

Organiser in Teams Live Events

The organiser is the person responsible for selecting the event team members and their responsibilities, scheduling the live event, configuring the event permissions and settings and distributing invitations to potential attendees.

The organiser should also take responsibility for the event setup and any testing required before the event.

For example, you might simply decide to use your laptop’s integrated webcam for your video and produce your live event straight in Teams. Even if you do this, you should think of testing variables such as the acoustics in the room, lighting and your connection.

Microsoft have a great Teams Live Event Organiser Checklist here that’s worth reading.

Producers in Teams Live Events

There is only one producer. The producer sends the event live and also finishes the event.

The producer controls the live event, taking responsibility for ensuring the correct content and format is being presented at the right times to the audience. The producer can share their own video or screen share, as well as video and content from the presenters.

Presenters in Teams Live Events

You can have multiple presenters on your live events. Each presenter can present their audio, content (screen sharing), or live video (webcam or camera) during the event – but only if the event is being produced in Teams (as opposed to an external platform).

Presenters can also act as moderators if you have switched on the live Q&A session option.

Attendees

Your Teams Live Event attendees can be external or internal attendees – depending on whether you make your event public or private. Attendees can join the event via their invitation link and can either view the event in their web browser or Teams app if they have it.

Public attendees can choose to either view the event as ‘anonymous’ or they can log in with their Microsoft account. If they do choose to join anonymously, they can still set a name for themselves if they wish to — which can optionally be displayed when asking questions during a live Q&A session.

How to schedule a Teams Live Event

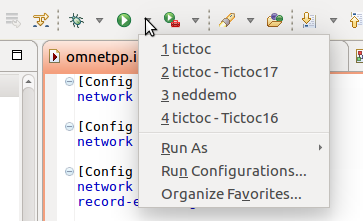
To schedule a Live event, simply go to your calendar in Microsoft Teams. In the top right corner of the screen, click on the drop-down arrow and select ‘Live event’.

Scheduling a live event in Microsoft Teams calendar

You’ll now be presented with the live event set-up screen. Here you can add the following details:

Title: Give the live event a name
Location: Add a physical location to the event, such as the conference room from which you’ll be presenting – if you wish
Start and end: Set the date and time of the event
Details: Provide details of the event for attendees
Organiser: you can choose if you’ll be the producer or presenter
Presenters: Add any other colleagues who will be presenting by typing their name or email address

Click next.

Adding live event details in Microsoft Teams

You’ll now be given the choice of attendee access permissions for your Teams live event.

People and groups: If you select this, you will see a box where you can add a person by name or email address – or you can add an Office 365 group (e.g. your Finance Team)
Org-wide: This will enable anyone within your organisation to join the event simply by signing in
Public: This means anyone can join the live event – as long as they have a link to the event

N.B. if the ‘Public’ option is greyed out, this is because it is switched off by default. You will need to contact your IT administrator and request that the public option is enabled.

Live event permissions in Microsoft Teams live events

Below this, you will see further options to choose from.

Settings to decide how you will produce your live event

The options are split into ‘Teams’ and ‘External app or device’.

We’ll be focusing on the Teams option, as the external device option is for situations where you might be recording and presenting from something like a professional film set-up with an external encoder – which is beyond the scope of most employees’ needs.

Recording available to producers and presenters: this is greyed out as this is automatically enabled
Recording available to attendees: this means a recording of the event will be created for anyone that missed the event or for those who want to watch the event again later
Captions: this is greyed out as we haven’t enabled this option, but if you choose to enable it you will be able to see text captions created based on the audio – and you’ll have the option to translate this to up to six languages
Attendee engagement report: this report gives you the option of accessing an engagement report which gives you information on the attendees
Q&A: this is toggled off, but you can toggle it on if you want event attendees to be able to ask questions to the presenters to inform a Q&A session during the live event

Once you’ve selected the options you want, click the ‘schedule’ button and you’ll see the following screen.

The live event sharing link in teams

The ‘Get attendee link’ button will copy a URL link to your clipboard, which you can then paste into anything from an email to a WhatsApp message – enabling you to share your link with potential attendees.

Following the event, attendees will be able to watch the event again with the same link — but only if you ticked the ‘Recording available to attendees’ option during the event set up.

Starting your Teams Live Event

If you have added presenters to your live event, they will receive an email invitation as in the example below. They just have to accept the invitation and add it to their calendar.

Presenter event email invite

Anyone acting as a Presenter, must use the Teams desktop app. It doesn’t matter if it’s Windows or Mac, but you can’t present using the web app or mobile app.

If you decide to remove them as a presenter, simply go into your calendar, click on your live event and then ‘edit’. You can remove the presenter and click ‘update’ which will send them an email saying the event has been cancelled with the option to remove it from their calendar.

As the producer, you can now get the event started. Simply go into your calendar and click on the live event. This screen will appear and you’ll be able to click the join button to join the event.

The join button to join your live event

N.B. the event won’t be live straight away, this will just take you to the producer’s user interface where you can get your content ready before going live.

As you can see below, the producer’s screen is split into two separate windows with ‘Queue’ and ‘Live Event’.

You will also notice a yellow button stating ‘pre-live’ towards the top of the screen, which means the event isn’t live yet.

Teams live events producer user interface

At this point, if any of your attendees were to join the event via the link, they would see the following screen.

The live event hasn't started welcome screen

Adding content to the queue in Teams Live Events

On the producer’s screen, you can add content to the Queue. If a presenter has shared some content, you will see a small thumbnail image of their content at the bottom of the screen - which you can select.

If you are both the producer and the presenter, click the ‘share’ button and you will see all of the different windows you have open on your device. You can select any of these to share.

Sharing content to the queue in teams live events

Select one and it will send it to the queue window.

If you’re on a laptop with a smaller screen, the window may crop some of the content so it appears as if some of the content is missing. Don’t worry about this — the content will display fully for attendees.

Adding content to the queue in teams live events

If you want to share video of you or a presenter next to the content, you can use the small button below the queue window to toggle between views (known as ‘single source’ or ‘content left’).

Queue format button

The ‘Content left’ layout appears like this, with the content on the left and a space for video on the right side of the window.

Adding content and video together in teams live events

To add video, click ‘add video from below’ and it will highlight purple.

Adding video next to content in the queue

You can now select a video feed from yourself or one of your presenters and it will display next to the content in the queue.

Next, you’ll want to click the ‘Send live’ button which will add the content to the ‘Live event’ window too.

Video next to content ready for sending live

The event is not yet live, so next you’ll need to click the yellow ‘Start’ button.

Using the start button to start the live event

This will bring up the following prompt. Click 'Continue' and the event will be live for attendees.

The start live event message window

You’ll know that you are live as you will see a red ‘Live’ button towards the top left corner of the screen — along with a red dot (recording), the event name, how long the event has been running and the numbers of attendees viewing the event.

Recording icon and attendee numbers

Now that the event is live, your attendees will see the content live on their screen — likely following a delay.

There will also be a red ‘End’ button under the live event window – which you can use to end the event once you’re finished.

The event once live and end button

How to switch between content in Teams Live Events

Switching between content isn’t quite as simple as you might expect it to be. It’s very important that you run test events before your main event to ensure that you’re comfortable with the functionality and how to switch between your content and presenter’s content.

If you’re sharing some content live, you can’t add multiple pieces of content to the queue at once — which would be ideal.

For example, if you were sharing a PowerPoint deck and wanted to switch to sharing an application like Dynamics 365, you would ideally want to queue up the Dynamics 365 window in the queue and then send it live once you were finished with the PowerPoint deck.

However, you can’t do this. What you can do is click ‘stop sharing’. This will stop sharing your content and the attendees will see this screen while you find your next piece of content to share.

N.B. if you were displaying your video next to your content using the ‘content left’ view, your video will then be shared full screen with attendees while you find the next piece of content to share. 

The window when you stop sharing saying live event will continue in a moment

You can then click ‘share’ again and pick the next piece of content which will be pushed straight into live – so be aware of this.

If you are sharing content, you can queue your live video and then click 'Send live' (whilst you are selecting your next piece of content to share). This creates a more seamless transition, without showing attendees the 'live event will continue in a moment' screen.

N.B. It's also worth noting that when content is being shared during the live event, if a Producer or a Presenter clicks 'share' and selects some different content, this will push straight into the live and attendees will see the content. Therefore, you'll want to do a rehearsal of your event beforehand and make sure each member of the teams knows the timings for actions such as sharing and when their video is going to be live.   

Q&A in Microsoft Teams Live Events

If you enabled a Q&A when creating your live event, the attendees will have the option to ask questions in the right-hand Q&A window. They can either post anonymously or add a name above their question.

Q&A screen for attendees in teams live events

When an attendee asks a question, you’ll see a small notification above the ‘Q&A’ icon in the menu bar in the top right of your screen.

Q&A notifications in live events

If you click on the icon, it will open your Live event Q&A window on the right of your screen. You’ll see the new question(s) under the ‘New’ tab. You can either send a private reply, or you can click ‘publish’ which will make the question visible to all of the event attendees. If you choose to click ‘dismiss’, the question will be parked into the ‘dismissed’ tab.

Replying to questions in the Q&A window

The questions you choose to publish will appear as ‘Featured’ questions to attendees. As you can see in the screenshot below, attendees can see featured questions as well as questions they have asked under the ‘My questions’ tab.

Responses in Q&A

You can also use the button ‘Make an announcement’ to publish message to all attendees. This is useful if you want to say something along the lines of “Hi everyone, the event will be starting in around 5 minutes”.

What to do after the Teams live event has finished

After the live event has finished, go back to your calendar in Teams and open up the live event calendar item.

Once the pop-up window opens with the event details, scroll down and you’ll see ‘Live event resources’.

Live event resources in teams live events

Here you can download:

Recording: a video file of the live event
Q&A report: a .csv file with record of questions asked, responses and identities
Attendee engagement report: a .csv file with names of attendees – where provided – and actions taken/roles

An example of the Q&A report is below where you can see a question asked by an attendee and the moderator’s response.

Q&A report in live event resources

The final thing to do is to follow up with your attendees with any resources you want to share as a take-away and your call-to-action.

Wednesday 23 October 2019

OMNeT++ Tutorials

  • TicToc. An introductory tutorial that guides you through building and working with an example simulation model.
  • Result Analysis with Python. This tutorial will walk you through the initial steps of using Python for analysing simulation results, and shows how to do some of the most common tasks.
  • Running Simulation Campaigns in the Cloud. Concepts, ideas and a solution draft for harnessing the power of computing clouds for running simulation campaigns.
  • Running INET Simulation Campaigns on AWS. Presents a minimal but powerful toolset for running INET simulations on Amazon's cloud platform

Introduction

  • This tutorial guides you through building and working with an example simulation model, showing you along the way some of the commonly used OMNeT++ features.
    The tutorial is based on the Tictoc example simulation, which you can find in the samples/tictoc directory of your OMNeT++ installation, so you can try out immediately how the examples work. However, you'll find the tutorial much more useful if you actually carry out the steps described here. We assume that you have a good C++ knowledge, and you are in general familiar with C/C++ development (editing source files, compiling, debugging etc.) To make the examples easier to follow, all source code in here is cross-linked to the OMNeT++ API documentation.
    This document and the TicToc model are an expanded version of the original TicToc tutorial from Ahmet Sekercioglu (Monash University).

Part 1 - Getting Started

1.1 The model

  • For a start, let us begin with a "network" that consists of two nodes. The nodes will do something simple: one of the nodes will create a packet, and the two nodes will keep passing the same packet back and forth. We'll call the nodes tic and toc. Later we'll gradually improve this model, introducing OMNeT++ features at each step.
    Here are the steps you take to implement your first simulation from scratch.

1.2 Setting up the project

  • Start the OMNeT++ IDE by typing omnetpp in your terminal. (We assume that you already have a working OMNeT++ installation. If not, please install the latest version, consulting the Installation Guide as needed.) Once in the IDE, choose New -> OMNeT++ Project from the menu.
    A wizard dialog will appear. Enter tictoc as project name, choose Empty project when asked about the initial content of the project, then click Finish. An empty project will be created, as you can see in the Project Explorer. (Note: Some OMNeT++ versions will generate a package.ned file into the project. We don't need it now: delete the file by selecting it and hitting Delete.)
    The project will hold all files that belong to our simulation. In our example, the project consists of a single directory. For larger simulations, the project's contents are usually sorted into src/ and simulations/ folders, and possibly subfolders underneath them.
    Note
    Using the IDE is entirely optional. Almost all functionality of OMNeT++ (except for some very graphics-intensive and interactive features like sequence chart browsing and result plotting) is available on the command line. Model source files can be edited with any text editor, and OMNeT++ provides command-line tools for special tasks such as makefile creation, message file to C++ translation, result file querying and data export, and so on. To proceed without the IDE, simply create a directory and create the following NED, C++ and ini files in it with your favorite text editor.

1.3 Adding the NED file

  • OMNeT++ uses NED files to define components and to assemble them into larger units like networks. We start implementing our model by adding a NED file. To add the file to the project, right-click the project directory in the Project Explorer panel on the left, and choose New -> Network Description File (NED) from the menu. Enter tictoc1.ned when prompted for the file name.
    Once created, the file can be edited in the Editor area of the OMNeT++ IDE. The OMNeT++ IDE's NED editor has two modes, Design and Source; one can switch between them using the tabs at the bottom of the editor. In Design mode, the topology can be edited graphically, using the mouse and the palette on the right. In Source mode, the NED source code can be directly edited as text. Changes done in one mode will be immediately reflected in the other, so you can freely switch between modes during editing, and do each change in whichever mode it is more convenient. (Since NED files are plain text files, you can even use an external text editor to edit them, although you'll miss syntax highlighting, content assist, cross-references and other IDE features.)
    Switch into Source mode, and enter the following:
    simple Txc1
    {
    gates:
    input in;
    output out;
    }
    //
    // Two instances (tic and toc) of Txc1 connected both ways.
    // Tic and toc will pass messages to one another.
    //
    network Tictoc1
    {
    submodules:
    tic: Txc1;
    toc: Txc1;
    connections:
    tic.out --> { delay = 100ms; } --> toc.in;
    tic.in <-- { delay = 100ms; } <-- toc.out;
    }
    When you're done, switch back to Design mode. You should see something like this:
    The first block in the file declares Txc1 as a simple module type. Simple modules are atomic on NED level. They are also active components, and their behavior is implemented in C++. The declaration also says that Txc1 has an input gate named in, and an output gate named out.
    The second block declares Tictoc1 as a network. Tictoc1 is assembled from two submodules, tic and toc, both instances of the module type Txc1tic's output gate is connected to toc's input gate, and vica versa. There will be a 100ms propagation delay both ways.
    Note
    You can find a detailed description of the NED language in the OMNeT++ Simulation Manual. (The manual can also be found in the doc directory of your OMNeT++ installation.)

1.4 Adding the C++ files

  • We now need to implement the functionality of the Txc1 simple module in C++. Create a file named txc1.cc by choosing New -> Source File from the project's context menu (or File -> New -> File from the IDE's main menu), and enter the following content:
    #include <string.h>
    #include <omnetpp.h>
    using namespace omnetpp;
    /**
    * Derive the Txc1 class from cSimpleModule. In the Tictoc1 network,
    * both the `tic' and `toc' modules are Txc1 objects, created by OMNeT++
    * at the beginning of the simulation.
    */
    class Txc1 : public cSimpleModule
    {
    protected:
    // The following redefined virtual function holds the algorithm.
    virtual void initialize() override;
    virtual void handleMessage(cMessage *msg) override;
    };
    // The module class needs to be registered with OMNeT++
    Define_Module(Txc1);
    void Txc1::initialize()
    {
    // Initialize is called at the beginning of the simulation.
    // To bootstrap the tic-toc-tic-toc process, one of the modules needs
    // to send the first message. Let this be `tic'.
    // Am I Tic or Toc?
    if (strcmp("tic", getName()) == 0) {
    // create and send first message on gate "out". "tictocMsg" is an
    // arbitrary string which will be the name of the message object.
    cMessage *msg = new cMessage("tictocMsg");
    send(msg, "out");
    }
    }
    void Txc1::handleMessage(cMessage *msg)
    {
    // The handleMessage() method is called whenever a message arrives
    // at the module. Here, we just send it to the other module, through
    // gate `out'. Because both `tic' and `toc' does the same, the message
    // will bounce between the two.
    send(msg, "out"); // send out the message
    }
    The Txc1 simple module type is represented by the C++ class Txc1. The Txc1 class needs to subclass from OMNeT++'s cSimpleModule class, and needs to be registered in OMNeT++ with the Define_Module() macro.
    Note
    It is a common mistake to forget the Define_Module() line. If it is missing, you'll get an error message similar to this one: "Error: Class 'Txc1' not found -- perhapsits code was not linked in, or the class wasn't registered with Register_Class(), or inthe case of modules and channels, with Define_Module()/Define_Channel()".
    We redefine two methods from cSimpleModuleinitialize() and handleMessage(). They are invoked from the simulation kernel: the first one only once, and the second one whenever a message arrives at the module.
    In initialize() we create a message object (cMessage), and send it out on gate out. Since this gate is connected to the other module's input gate, the simulation kernel will deliver this message to the other module in the argument to handleMessage() -- after a 100ms propagation delay assigned to the link in the NED file. The other module just sends it back (another 100ms delay), so it will result in a continuous ping-pong.
    Messages (packets, frames, jobs, etc) and events (timers, timeouts) are all represented by cMessage objects (or its subclasses) in OMNeT++. After you send or schedule them, they will be held by the simulation kernel in the "scheduled events" or "future events" list until their time comes and they are delivered to the modules via handleMessage().
    Note that there is no stopping condition built into this simulation: it would continue forever. You will be able to stop it from the GUI. (You could also specify a simulation time limit or CPU time limit in the configuration file, but we don't do that in the tutorial.)

1.5 Adding omnetpp.ini

  • To be able to run the simulation, we need to create an omnetpp.ini file. omnetpp.ini tells the simulation program which network you want to simulate (as NED files may contain several networks), you can pass parameters to the model, explicitly specify seeds for the random number generators, etc.
    Create an omnetpp.ini file using the File -> New -> Initialization file (INI) menu item. The new file will open in an Inifile Editor. As the NED Editor, the Inifile Editor also has two modes, Form and Source, which edit the same content. The former is more suitable for configuring the simulation kernel, and the latter for entering module parameters.
    For now, just switch to Source mode and enter the following:
    [General]
    network = Tictoc1
    
    You can verify the result in Form mode:
    tictoc2 and further steps will all share a common omnetpp.ini file.
    We are now done with creating the first model, and ready to compile and run it.

Part 3 - Enhancing the 2-node TicToc

3.1 Adding icons

  • Here we make the model look a bit prettier in the GUI. We assign the block/routing icon (the file images/block/routing.png), and paint it cyan for tic and yellow for toc. This is achieved by adding display strings to the NED file. The i= tag in the display string specifies the icon.
    simple Txc2
    {
    parameters:
    @display("i=block/routing"); // add a default icon
    gates:
    input in;
    output out;
    }
    //
    // Make the two module look a bit different with colorization effect.
    // Use cyan for `tic', and yellow for `toc'.
    //
    network Tictoc2
    {
    submodules:
    tic: Txc2 {
    parameters:
    @display("i=,cyan"); // do not change the icon (first arg of i=) just colorize it
    }
    toc: Txc2 {
    parameters:
    @display("i=,gold"); // here too
    }
    connections:
    tic.out --> { delay = 100ms; } --> toc.in;
    tic.in <-- { delay = 100ms; } <-- toc.out;
    }
    You can see the result here:

3.2 Adding logging

  • We also modify the C++ code. We add log statements to Txc1 so that it prints what it is doing. OMNeT++ provides a sophisticated logging facility with log levels, log channels, filtering, etc. that are useful for large and complex models, but in this model we'll use its simplest form EV:
    EV << "Sending initial message\n";
    and
    EV << "Received message `" << msg->getName() << "', sending it out again\n";
    When you run the simulation in the OMNeT++ runtime environment, the following output will appear in the log window:
    You can also open separate output windows for tic and toc by right-clicking on their icons and choosing Component log from the menu. This feature will be useful when you have a large model ("fast scrolling logs syndrome") and you're interested only in the log messages of specific module.

3.3 Adding state variables

  • In this step we add a counter to the module, and delete the message after ten exchanges.
    We add the counter as a class member:
    class Txc3 : public cSimpleModule
    {
    private:
    int counter; // Note the counter here
    protected:
    We set the variable to 10 in initialize() and decrement in handleMessage(), that is, on every message arrival. After it reaches zero, the simulation will run out of events and terminate.
    Note the
    WATCH(counter);
    line in the source: this makes it possible to see the counter value in the graphical runtime environment.
    If you click on tic's icon, the inspector window in the bottom left corner of the main window will display details about tic. Make sure that Children mode is selected from the toolbar at the top. The inspector now displays the counter variable.
    As you continue running the simulation, you can follow as the counter keeps decrementing until it reaches zero.

3.4 Adding parameters

  • In this step you'll learn how to add input parameters to the simulation: we'll turn the "magic number" 10 into a parameter and add a boolean parameter to decide whether the module should send out the first message in its initialization code (whether this is a tic or a toc module).
    Module parameters have to be declared in the NED file. The data type can be numeric, string, bool, or xml (the latter is for easy access to XML config files), among others.
    simple Txc4
    {
    parameters:
    bool sendMsgOnInit = default(false); // whether the module should send out a message on initialization
    int limit = default(2); // another parameter with a default value
    @display("i=block/routing");
    gates:
    We also have to modify the C++ code to read the parameter in initialize(), and assign it to the counter.
    counter = par("limit");
    We can use the second parameter to decide whether to send initial message:
    if (par("sendMsgOnInit").boolValue() == true) {
    Now, we can assign the parameters in the NED file or from omnetpp.ini. Assignments in the NED file take precedence. You can define default values for parameters if you use the default(...) syntax in the NED file. In this case you can either set the value of the parameter in omnetpp.ini or use the default value provided by the NED file.
    Here, we assign one parameter in the NED file:
    network Tictoc4
    {
    submodules:
    tic: Txc4 {
    parameters:
    sendMsgOnInit = true;
    @display("i=,cyan");
    }
    toc: Txc4 {
    parameters:
    sendMsgOnInit = false;
    @display("i=,gold");
    }
    connections:
    and the other in omnetpp.ini:
    Tictoc4.toc.limit = 5
    Note that because omnetpp.ini supports wildcards, and parameters assigned from NED files take precedence over the ones in omnetpp.ini, we could have used

    Tictoc4.t*c.limit=5
    
    or

    Tictoc4.*.limit=5
    
    or even

    **.limit=5
    
    with the same effect. (The difference between * and ** is that * will not match a dot and ** will.)
    In the graphical runtime environment, you can inspect module parameters either in the object tree on the left-hand side of the main window, or in the Parameters page of the module inspector (information is shown in the bottom left corner of the main window after clicking on a module).
    The module with the smaller limit will delete the message and thereby conclude the simulation.

3.5 Using NED inheritance

  • If we take a closer look at the NED file we will realize that tic and toc differs only in their parameter values and their display string. We can create a new simple module type by inheriting from an other one and specifying or overriding some of its parameters. In our case we will derive two simple module types (Tic and Toc). Later we can use these types when defining the submodules in the network.
    Deriving from an existing simple module is easy. Here is the base module:
    simple Txc5
    {
    parameters:
    bool sendMsgOnInit = default(false);
    int limit = default(2);
    @display("i=block/routing");
    gates:
    input in;
    output out;
    }
    And here is the derived module. We just simply specify the parameter values and add some display properties.
    simple Tic5 extends Txc5
    {
    parameters:
    @display("i=,cyan");
    sendMsgOnInit = true; // Tic modules should send a message on init
    }
    The Toc module looks similar, but with different parameter values.
    simple Toc5 extends Txc5
    {
    parameters:
    @display("i=,gold");
    sendMsgOnInit = false; // Toc modules should NOT send a message on init
    }
    Note
    The C++ implementation is inherited from the base simple module (Txc5).
    Once we created the new simple modules, we can use them as submodule types in our network:
    network Tictoc5
    {
    submodules:
    tic: Tic5; // the limit parameter is still unbound here. We will get it from the ini file
    toc: Toc5;
    connections:
    As you can see, the network definition is much shorter and simpler now. Inheritance allows you to use common types in your network and avoid redundant definitions and parameter settings.

3.6 Modeling processing delay

  • In the previous models, tic and toc immediately sent back the received message. Here we'll add some timing: tic and toc will hold the message for 1 simulated second before sending it back. In OMNeT++ such timing is achieved by the module sending a message to itself. Such messages are called self-messages (but only because of the way they are used, otherwise they are ordinary message objects).
    We added two cMessage * variables, event and tictocMsg to the class, to remember the message we use for timing and message whose processing delay we are simulating.
    class Txc6 : public cSimpleModule
    {
    private:
    cMessage *event; // pointer to the event object which we'll use for timing
    cMessage *tictocMsg; // variable to remember the message until we send it back
    public:
    We "send" the self-messages with the scheduleAt() function, specifying when it should be delivered back to the module.
    scheduleAt(simTime()+1.0, event);
    In handleMessage() now we have to differentiate whether a new message has arrived via the input gate or the self-message came back (timer expired). Here we are using
    if (msg == event) {
    but we could have written

        if (msg->isSelfMessage())
    
    as well.
    We have left out the counter, to keep the source code small.
    While running the simulation you will see the following log output:

3.7 Random numbers and parameters

  • In this step we'll introduce random numbers. We change the delay from 1s to a random value which can be set from the NED file or from omnetpp.ini. Module parameters are able to return random variables; however, to make use of this feature we have to read the parameter in handleMessage() every time we use it.
    // The "delayTime" module parameter can be set to values like
    // "exponential(5)" (tictoc7.ned, omnetpp.ini), and then here
    // we'll get a different delay every time.
    simtime_t delay = par("delayTime");
    EV << "Message arrived, starting to wait " << delay << " secs...\n";
    tictocMsg = msg;
    In addition, we'll "lose" (delete) the packet with a small (hardcoded) probability.
    if (uniform(0, 1) < 0.1) {
    EV << "\"Losing\" message\n";
    delete msg;
    }
    We'll assign the parameters in omnetpp.ini:
    Tictoc7.tic.delayTime = exponential(3s)
    Tictoc7.toc.delayTime = truncnormal(3s,1s)
    You can try that no matter how many times you re-run the simulation (or restart it, Simulate -> Rebuild network menu item), you'll get exactly the same results. This is because OMNeT++ uses a deterministic algorithm (by default the Mersenne Twister RNG) to generate random numbers, and initializes it to the same seed. This is important for reproducible simulations. You can experiment with different seeds if you add the following lines to omnetpp.ini:

    [General]
    seed-0-mt=532569  # or any other 32-bit value
    
    From the syntax you have probably guessed that OMNeT++ supports more than one RNGs. That's right, however, all models in this tutorial use RNG 0.
    Exercise
    Try other distributions as well.

3.8 Timeout, cancelling timers

  • In order to get one step closer to modelling networking protocols, let us transform our model into a stop-and-wait simulation. This time we'll have separate classes for tic and toc. The basic scenario is similar to the previous ones: tic and toc will be tossing a message to one another. However, toc will "lose" the message with some nonzero probability, and in that case tic will have to resend it.
    Here's toc's code:
    void Toc8::handleMessage(cMessage *msg)
    {
    if (uniform(0, 1) < 0.1) {
    EV << "\"Losing\" message.\n";
    bubble("message lost"); // making animation more informative...
    delete msg;
    }
    else {
    Thanks to the bubble() call in the code, toc will display a callout whenever it drops the message.
    So, tic will start a timer whenever it sends the message. When the timer expires, we'll assume the message was lost and send another one. If toc's reply arrives, the timer has to be cancelled. The timer will be (what else?) a self-message.
    scheduleAt(simTime()+timeout, timeoutEvent);
    Cancelling the timer will be done with the cancelEvent() call. Note that this does not prevent us from being able to reuse the same timeout message over and over.
    cancelEvent(timeoutEvent);
    You can read Tic's full source in txc8.cc

3.9 Retransmitting the same message

  • In this step we refine the previous model. There we just created another packet if we needed to retransmit. This is OK because the packet didn't contain much, but in real life it's usually more practical to keep a copy of the original packet so that we can re-send it without the need to build it again. Keeping a pointer to the sent message - so we can send it again - might seem easier, but when the message is destroyed at the other node the pointer becomes invalid.
    What we do here is keep the original packet and send only copies of it. We delete the original when toc's acknowledgement arrives. To make it easier to visually verify the model, we'll include a message sequence number in the message names.
    In order to avoid handleMessage() growing too large, we'll put the corresponding code into two new functions, generateNewMessage() and sendCopyOf() and call them from handleMessage().
    The functions:
    cMessage *Tic9::generateNewMessage()
    {
    // Generate a message with a different name every time.
    char msgname[20];
    sprintf(msgname, "tic-%d", ++seq);
    cMessage *msg = new cMessage(msgname);
    return msg;
    }
    void Tic9::sendCopyOf(cMessage *msg)
    {
    // Duplicate message and send the copy.
    cMessage *copy = (cMessage *)msg->dup();
    send(copy, "out");
    }

Part 4 - Turning it Into a Real Network

4.1 More than two nodes

  • Now we'll make a big step: create several tic modules and connect them into a network. For now, we'll keep it simple what they do: one of the nodes generates a message, and the others keep tossing it around in random directions until it arrives at a predetermined destination node.
    The NED file will need a few changes. First of all, the Txc module will need to have multiple input and output gates:
    simple Txc10
    {
    parameters:
    @display("i=block/routing");
    gates:
    input in[]; // declare in[] and out[] to be vector gates
    output out[];
    }
    The [ ] turns the gates into gate vectors. The size of the vector (the number of gates) will be determined where we use Txc to build the network.
    network Tictoc10
    {
    submodules:
    tic[6]: Txc10;
    connections:
    tic[0].out++ --> { delay = 100ms; } --> tic[1].in++;
    tic[0].in++ <-- { delay = 100ms; } <-- tic[1].out++;
    tic[1].out++ --> { delay = 100ms; } --> tic[2].in++;
    tic[1].in++ <-- { delay = 100ms; } <-- tic[2].out++;
    tic[1].out++ --> { delay = 100ms; } --> tic[4].in++;
    tic[1].in++ <-- { delay = 100ms; } <-- tic[4].out++;
    tic[3].out++ --> { delay = 100ms; } --> tic[4].in++;
    tic[3].in++ <-- { delay = 100ms; } <-- tic[4].out++;
    tic[4].out++ --> { delay = 100ms; } --> tic[5].in++;
    tic[4].in++ <-- { delay = 100ms; } <-- tic[5].out++;
    }
    Here we created 6 modules as a module vector, and connected them.
    The resulting topology looks like this:
    In this version, tic[0] will generate the message to be sent around. This is done in initialize(), with the help of the getIndex() function which returns the index of the module in the vector.
    The meat of the code is the forwardMessage() function which we invoke from handleMessage() whenever a message arrives at the node. It draws a random gate number, and sends out message on that gate.
    void Txc10::forwardMessage(cMessage *msg)
    {
    // In this example, we just pick a random gate to send it on.
    // We draw a random number between 0 and the size of gate `out[]'.
    int n = gateSize("out");
    int k = intuniform(0, n-1);
    EV << "Forwarding message " << msg << " on port out[" << k << "]\n";
    send(msg, "out", k);
    }
    When the message arrives at tic[3], its handleMessage() will delete the message.
    See the full code in txc10.cc
    Exercise
    You'll notice that this simple "routing" is not very efficient: often the packet keeps bouncing between two nodes for a while before it is sent to a different direction. This can be improved somewhat if nodes don't send the packet back to the sender. Implement this. Hints: cMessage::getArrivalGate()cGate::getIndex(). Note that if the message didn't arrive via a gate but was a self-message, then getArrivalGate() returns NULL.

4.2 Channels and inner type definitions

  • Our new network definition is getting quite complex and long, especially the connections section. Let's try to simplify it. The first thing we notice is that the connections always use the same delay parameter. It is possible to create types for the connections (they are called channels) similarly to simple modules. We should create a channel type which specifies the delay parameter and we will use that type for all connections in the network.
    network Tictoc11
    {
    types:
    channel Channel extends ned.DelayChannel {
    delay = 100ms;
    }
    submodules:
    As you have noticed we have defined the new channel type inside the network definition by adding a types section. This type definition is only visible inside the network. It is called as a local or inner type. You can use simple modules as inner types too, if you wish.
    Note
    We have created the channel by specializing the built-in DelayChannel. (built-in channels can be found inside the ned package. Thats why we used the full type name ned.DelayChannel) after the extends keyword.
    Now let's check how the connections section changed.
    connections:
    tic[0].out++ --> Channel --> tic[1].in++;
    tic[0].in++ <-- Channel <-- tic[1].out++;
    tic[1].out++ --> Channel --> tic[2].in++;
    tic[1].in++ <-- Channel <-- tic[2].out++;
    tic[1].out++ --> Channel --> tic[4].in++;
    tic[1].in++ <-- Channel <-- tic[4].out++;
    tic[3].out++ --> Channel --> tic[4].in++;
    tic[3].in++ <-- Channel <-- tic[4].out++;
    tic[4].out++ --> Channel --> tic[5].in++;
    tic[4].in++ <-- Channel <-- tic[5].out++;
    }
    As you see we just specify the channel name inside the connection definition. This allows to easily change the delay parameter for the whole network.

4.3 Using two-way connections

  • If we check the connections section a little more, we will realize that each node pair is connected with two connections. One for each direction. OMNeT++ 4 supports two way connections, so let's use them.
    First of all, we have to define two-way (or so called inout) gates instead of the separate input and output gates we used previously.
    simple Txc12
    {
    parameters:
    @display("i=block/routing");
    gates:
    inout gate[]; // declare two way connections
    }
    The new connections section would look like this:
    connections:
    tic[0].gate++ <--> Channel <--> tic[1].gate++;
    tic[1].gate++ <--> Channel <--> tic[2].gate++;
    tic[1].gate++ <--> Channel <--> tic[4].gate++;
    tic[3].gate++ <--> Channel <--> tic[4].gate++;
    tic[4].gate++ <--> Channel <--> tic[5].gate++;
    }
    We have modified the gate names so we have to make some modifications to the C++ code.
    void Txc12::forwardMessage(cMessage *msg)
    {
    // In this example, we just pick a random gate to send it on.
    // We draw a random number between 0 and the size of gate `gate[]'.
    int n = gateSize("gate");
    int k = intuniform(0, n-1);
    EV << "Forwarding message " << msg << " on gate[" << k << "]\n";
    // $o and $i suffix is used to identify the input/output part of a two way gate
    send(msg, "gate$o", k);
    }
    Note
    The special $i and $o suffix after the gate name allows us to use the connection's two direction separately.

4.4 Defining our message class

  • In this step the destination address is no longer hardcoded tic[3] -- we draw a random destination, and we'll add the destination address to the message.
    The best way is to subclass cMessage and add destination as a data member. Hand-coding the message class is usually tedious because it contains a lot of boilerplate code, so we let OMNeT++ generate the class for us. The message class specification is in tictoc13.msg:
    message TicTocMsg13
    {
    int source;
    int destination;
    int hopCount = 0;
    }
    Note
    See Section 6 of the OMNeT++ manual for more details on messages.
    The makefile is set up so that the message compiler, opp_msgc is invoked and it generates tictoc13_m.h and tictoc13_m.cc from the message declaration (The file names are generated from the tictoc13.msg file name, not the message type name). They will contain a generated TicTocMsg13 class subclassed from [cMessage]; the class will have getter and setter methods for every field.
    We'll include tictoc13_m.h into our C++ code, and we can use TicTocMsg13 as any other class.
    #include "tictoc13_m.h"
    For example, we use the following lines in generateMessage() to create the message and fill its fields.
    TicTocMsg13 *msg = new TicTocMsg13(msgname);
    msg->setSource(src);
    msg->setDestination(dest);
    return msg;
    Then, handleMessage() begins like this:
    void Txc13::handleMessage(cMessage *msg)
    {
    TicTocMsg13 *ttmsg = check_and_cast<TicTocMsg13 *>(msg);
    if (ttmsg->getDestination() == getIndex()) {
    In the argument to handleMessage(), we get the message as a cMessage* pointer. However, we can only access its fields defined in TicTocMsg13 if we cast msg to TicTocMsg13*. Plain C-style cast ((TicTocMsg13 *)msg) is not safe because if the message is not a TicTocMsg13 after all the program will just crash, causing an error which is difficult to explore.
    C++ offers a solution which is called dynamic_cast. Here we use check_and_cast<>() which is provided by OMNeT++: it tries to cast the pointer via dynamic_cast, and if it fails it stops the simulation with an error message, similar to the following:
    In the next line, we check if the destination address is the same as the node's address. The getIndex() member function returns the index of the module in the submodule vector (remember, in the NED file we declarared it as tic: Txc13[6], so our nodes have addresses 0..5).
    To make the model execute longer, after a message arrives to its destination the destination node will generate another message with a random destination address, and so forth. Read the full code: txc13.cc
    When you run the model, it'll look like this:
    You can click on the messages to see their content in the inspector window. Double-clicking will open the inspector in a new window. (You'll either have to temporarily stop the simulation for that, or to be very fast in handling the mouse). The inspector window displays lots of useful information; the message fields can be seen on the Contents page.

Part 5 - Adding Statistics Collection

5.1 Displaying the number of packets sent/received

  • To get an overview at runtime how many messages each node sent or received, we've added two counters to the module class: numSent and numReceived.
    class Txc14 : public cSimpleModule
    {
    private:
    long numSent;
    long numReceived;
    protected:
    They are set to zero and WATCH'ed in the initialize() method. Now we can use the Find/inspect objects dialog (Inspect menu; it is also on the toolbar) to learn how many packets were sent or received by the various nodes.
    It's true that in this concrete simulation model the numbers will be roughly the same, so you can only learn from them that intuniform() works properly. But in real-life simulations it can be very useful that you can quickly get an overview about the state of various nodes in the model.
    It can be also arranged that this info appears above the module icons. The t= display string tag specifies the text; we only need to modify the displays string during runtime. The following code does the job:
    void Txc14::refreshDisplay() const
    {
    char buf[40];
    sprintf(buf, "rcvd: %ld sent: %ld", numReceived, numSent);
    getDisplayString().setTagArg("t", 0, buf);
    }
    And the result looks like this:

5.2 Adding statistics collection

  • The previous simulation model does something interesting enough so that we can collect some statistics. For example, you may be interested in the average hop count a message has to travel before reaching its destination.
    We'll record in the hop count of every message upon arrival into an output vector (a sequence of (time,value) pairs, sort of a time series). We also calculate mean, standard deviation, minimum, maximum values per node, and write them into a file at the end of the simulation. Then we'll use tools from the OMNeT++ IDE to analyse the output files.
    For that, we add an output vector object (which will record the data into Tictoc15-#0.vec) and a histogram object (which also calculates mean, etc) to the class.
    class Txc15 : public cSimpleModule
    {
    private:
    long numSent;
    long numReceived;
    cLongHistogram hopCountStats;
    cOutVector hopCountVector;
    protected:
    When a message arrives at the destination node, we update the statistics. The following code has been added to handleMessage():
    hopCountVector.record(hopcount);
    hopCountStats.collect(hopcount);
    The hopCountVector.record() call writes the data into Tictoc15-#0.vec. With a large simulation model or long execution time, the Tictoc15-#0.vec file may grow very large. To handle this situation, you can specifically disable/enable vector in omnetpp.ini, and you can also specify a simulation time interval in which you're interested (data recorded outside this interval will be discarded.)
    When you begin a new simulation, the existing Tictoc15-#0.vec/sca files get deleted.
    Scalar data (collected by the histogram object in this simulation) have to be recorded manually, in the finish() function. finish() is invoked on successful completion of the simulation, i.e. not when it's stopped with an error. The recordScalar() calls in the code below write into the Tictoc15-#0.sca file.
    void Txc15::finish()
    {
    // This function is called by OMNeT++ at the end of the simulation.
    EV << "Sent: " << numSent << endl;
    EV << "Received: " << numReceived << endl;
    EV << "Hop count, min: " << hopCountStats.getMin() << endl;
    EV << "Hop count, max: " << hopCountStats.getMax() << endl;
    EV << "Hop count, mean: " << hopCountStats.getMean() << endl;
    EV << "Hop count, stddev: " << hopCountStats.getStddev() << endl;
    recordScalar("#sent", numSent);
    recordScalar("#received", numReceived);
    hopCountStats.recordAs("hop count");
    }
    The files are stored in the results/ subdirectory.
    You can also view the data during simulation. To do that, right click on a module, and choose Open Details. In the module inspector's Contents page you'll find the hopCountStats and hopCountVector objects. To open their inspectors, right click on cLongHistogram hopCountStats or cOutVector HopCount, and click Open Graphical View.
    The inspector:
    They will be initially empty -- run the simulation in Fast (or even Express) mode to get enough data to be displayed. After a while you'll get something like this:
    When you think enough data has been collected, you can stop the simulation and then we'll analyse the result files (Tictoc15-#0.vec and Tictoc15-#0.sca) off-line. You'll need to choose Simulate -> Call finish() from the menu (or click the corresponding toolbar button) before exiting -- this will cause the finish() functions to run and data to be written into Tictoc15-#0.sca.

5.3 Statistic collection without modifying your model

  • In the previous step we have added statistic collection to our model. While we can compute and save any value we wish, usually it is not known at the time of writing the model, what data the enduser will need.
    OMNeT++ provides an additional mechanism to record values and events. Any model can emit signals that can carry a value or an object. The model writer just have to decide what signals to emit, what data to attach to them and when to emit them. The enduser can attach 'listeners' to these signals that can process or record these data items. This way the model code does not have to contain any code that is specific to the statistics collection and the enduser can freely add additional statistics without even looking into the C++ code.
    We will re-write the statistic collection introduced in the last step to use signals. First of all, we can safely remove all statistic related variables from our module. There is no need for the cOutVector and cLongHistogram classes either. We will need only a single signal that carries the hopCount of the message at the time of message arrival at the destination.
    First we need to define our signal. The arrivalSignal is just an identifier that can be used later to easily refer to our signal.
    class Txc16 : public cSimpleModule
    {
    private:
    simsignal_t arrivalSignal;
    protected:
    We must register all signals before using them. The best place to do this is the initialize() method of the module.
    void Txc16::initialize()
    {
    arrivalSignal = registerSignal("arrival");
    // Module 0 sends the first message
    if (getIndex() == 0) {
    Now we can emit our signal, when the message has arrived to the destination node.
    void Txc16::handleMessage(cMessage *msg)
    {
    TicTocMsg16 *ttmsg = check_and_cast<TicTocMsg16 *>(msg);
    if (ttmsg->getDestination() == getIndex()) {
    // Message arrived
    int hopcount = ttmsg->getHopCount();
    // send a signal
    emit(arrivalSignal, hopcount);
    EV << "Message " << ttmsg << " arrived after " << hopcount << " hops.\n";
    As we do not have to save or store anything manually, the finish() method can be deleted. We no longer need it.
    The last step is that we have to define the emitted signal also in the NED file. Declaring signals in the NED file allows you to have all information about your module in one place. You will see the parameters it takes, its input and output gates, and also the signals and statistics it provides.
    simple Txc16
    {
    parameters:
    @signal[arrival](type="long");
    @statistic[hopCount](title="hop count"; source="arrival"; record=vector,stats; interpolationmode=none);
    @display("i=block/routing");
    Now we can define also a statistic that should be collected by default. Our previous example has collected statistics (max, min, mean, count, etc.) about the hop count of the arriving messages, so let's collect the same data here, too.
    The source key specifies the signal we want our statistic to attach to. The record key can be used to tell what should be done with the received data. In our case we specify that each value must be saved in a vector file (vector) and also we need to calculate min,max,mean,count etc. (stats). (NOTE: stats is just a shorthand for min, max, mean, sum, count, etc.) With this step we have finished our model.
    Now we have just realized that we would like to see a histogram of the hopCount on the tic[1] module. On the other hand we are short on disk storage and we are not interested having the vector data for the first three module tic 0,1,2. No problem. We can add our histogram and remove the unneeded vector recording without even touching the C++ or NED files. Just open the INI file and modify the statistic recording:
    [Config Tictoc16]
    network = Tictoc16
    **.tic[1].hopCount.result-recording-modes = +histogram
    **.tic[0..2].hopCount.result-recording-modes = -vector
    We can configure a wide range of statistics without even looking into the C++ code, provided that the original model emits the necessary signals for us.

5.4 Adding figures

  • OMNeT++ can display figures on the canvas, such as text, geometric shapes or images. These figures can be static, or change dynamically according to what happens in the simulation. In this case, we will display a static descriptive text, and a dynamic text showing the hop count of the last message that arrived at its destination.
    We create figures in tictoc17.ned, with the @figure property.
    network Tictoc17
    {
    parameters:
    @figure[description](type=text; pos=5,20; font=,,bold;
    text="Random routing example - displaying last hop count");
    @figure[lasthopcount](type=text; pos=5,35; text="last hopCount: N/A");
    This creates two text figures named description and lasthopcount, and sets their positions on the canvas (we place them in the top right corner). The font attribute sets the figure text's font. It has three parameters: typeface, size, style. Any one of them can be omitted to leave the parameter at default. Here we set the description figure's font to bold.
    By default the text in lasthopcount is static, but we'll change it when a message arrives. This is done in txc17.cc, in the handleMessage() function.
    if (hasGUI()) {
    char label[50];
    // Write last hop count to string
    sprintf(label, "last hopCount = %d", hopcount);
    // Get pointer to figure
    cCanvas *canvas = getParentModule()->getCanvas();
    cTextFigure *textFigure = check_and_cast<cTextFigure*>(canvas->getFigure("lasthopcount"));
    // Update figure text
    textFigure->setText(label);
    The figure is represented by the cTextFigure C++ class. There are several figure types, all of them are subclassed from the cFigure base class. We insert the code responsible for updating the figure text after we retreive the hopcount variable.
    We want to draw the figures on the network's canvas. The getParentModule() function returns the parent of the node, ie. the network. Then the getCanvas() function returns the network's canvas, and getFigure() gets the figure by name. Then, we update the figure's text with the setText() function.

    When you run the simulation, the figure displays 'last hopCount: N/A' before the arrival of the first message. Then, it is updated whenever a message arrives at its destination.
    Tip
    If the figure text and nodes overlap, press 're-layout'. 
    In the last few steps, we have collected and displayed statistics. In the next part, we'll see and analyze them in the IDE.

Part 6 - Visualizing the Results With the IDE

6.1 Visualizing output scalars and vectors

  • The OMNeT++ IDE can help you to analyze your results. It supports filtering, processing and displaying vector and scalar data, and can display histograms, too. The following diagrams have been created with the Result Analysis tool of the IDE.
    The results directory in the project folder contains .vec and .sca files, which are the files that store the results in vector and scalar form, respectively. Vectors record data values as a function of time, while scalars typically record aggregate values at the end of the simulation. To open the Result Analysis tool, double click on either the .vec or the .sca files in the OMNeT++ IDE. Both files will be loaded by the Result Analysis tool. You can find the Browse Data tab at the bottom of the Result Analysis tool panel. Here you can browse results by type by switching the various tabs at the top of the tool panel, ie. Scalars, Vectors, or Histograms. By default, all results of a result type are displayed. You can filter them by the module filter to view all or some of the individual modules, or the statistic name filter to display different types of statistics, ie. mean, max, min, standard deviation, etc. You can select some or all of the individual results by highlighting them. If you select multiple results, they will be plotted on one chart. Right click and select Plot to display the figures.

    Our last model records the hopCount of a message each time the message reaches its destination. To plot these vectors for all nodes, select the 6 nodes in the browse data tab. Right click and select Plot.
    We can change various options about how the data on the chart is displayed. Right click on the chart background, and select Properties. This opens the Edit LineChart window. In the Lines tab, set Line type to Dots, and Symbol Type to Dot.
    To add a legend to the chart, select Display legend on the Legend tab.
    The chart looks like the following:
    If we apply a mean operation we can see how the hopCount in the different nodes converge to an average. Right-click the chart, and select Apply -> Mean. Again, right-click on the chart background, and select Properties. In the Lines tab, set Line type to Linear, and Symbol Type to None. The mean is displayed on the following chart. The lines are easier to see this way because they are thinner.
    Scalar data can be plotted on bar charts. The next chart displays the mean and the maximum of the hopCount of the messages for each destination node, based on the scalar data recorded at the end of the simulation. In the Browse data tab, select Scalars. Now select hop count:max and hop count:mean for all 6 nodes.
    To create a histogram that shows hopCount's distribution, select Histograms on the Browse data tab. Select all nodes, and right click Plot.

Part 7 - Parameter Studies

7.1 The goal

  • We want to run the simulation with a different number of nodes, and see how the behavior of the network changes. With OMNeT++ you can do parameter studies, which are multiple simulation runs with different parameter values.
    We'll make the number of central nodes (the "handle" in the dumbbell shape) a parameter, and use the same random routing protocol as before. We're interested in how the average hop count depends on the number of nodes.

7.2 Making the network topology parametric

  • To parameterize the network, the number of nodes is given as a NED parameter, numCentralNodes. This parameter specifies how many nodes are in the central section of the network, but doesn't cover the two nodes at each side.
    The total number of nodes including the four nodes on the sides is numCentralNodes+4. The default of the numCentralNodes parameter is 2, this corresponds to the network in the previous step.
    network TicToc18
    {
    parameters:
    int numCentralNodes = default(2);
    types:
    channel Channel extends ned.DelayChannel {
    delay = 100ms;
    }
    submodules:
    tic[numCentralNodes+4]: Txc18;
    Now, we must specify that the variable number of nodes should be connected into the dumbbell shape. First, the two nodes on one side is connected to the third one. Then the the last two nodes on the other side is connected to the third last. The nodes in the center of the dumbbell can be connected with a for loop. Starting from the third, each *i*th node is connected to the *i+1*th.
    connections:
    // connect the 2 nodes in one side to the central nodes
    tic[0].gate++ <--> Channel <--> tic[2].gate++;
    tic[1].gate++ <--> Channel <--> tic[2].gate++;
    // connect the central nodes together
    for i=2..numCentralNodes+1 {
    tic[i].gate++ <--> Channel <--> tic[i+1].gate++;
    }
    // connect the 2 nodes on the other side to the central nodes
    tic[numCentralNodes+2].gate++ <--> Channel <--> tic[numCentralNodes+1].gate++;
    tic[numCentralNodes+3].gate++ <--> Channel <--> tic[numCentralNodes+1].gate++;
    Here is how the network looks like with numCentralNodes = 4:
    To run the simulation with multiple different values of numCentralNodes, we specify the variable N in the ini file:
    *.numCentralNodes = ${N=2..100 step 2}

7.3 Setting up a parameter study

  • We specify that N should go from 2 to 100, in steps of 2. This produces about 50 simulation runs. Each can be explored in the graphical user interface, but simulation batches are often run from the command line interface using the Cmdenv runtime environment.
    Tip
    You can find more information on variables and parameter studies in the Parameter Studies section of the OMNeT++ manual.
    To increase the accuracy of the simulation we may need to run the same simulation several times using different random numbers. These runs are called Repetitions and are specified in omnetpp.ini:
    repeat = 4
    This means that each simulation run will be executed four times, each time with a different seed for the RNGs. This produces more samples, which can be averaged. With more repetitions, the results will increasingly converge to the expected values.

7.4 Running the parameter study

  • Now, we can run the simulations. In the dropdown menu of the Run icon, select Run Configurations.
    In the Run Configurations dialog, select the config name, make sure Cmdenv is selected as the user interface.
    If you have a multicore CPU, you can specify how many simulations to run concurrently.
    Note
    Alternatively, you can run the simulation batches from the command line with opp_runall tool with the following command:
    opp_runall -j4 ./tictoc -u Cmdenv -c TicToc18
    
    The -j parameter specifies the number of CPU cores, the -u parameter the user interface, and -c the config to run.

7.5 Analyzing the results

  • Now, we can visualize and analyze the data we've collected from the simulation runs. We'll display the average hop count for messages that reach their destinations vs N, the number of central nodes. Additionally, we will display the average number of packets that reached their destinations vs N. The analysis file Tictoc18.anf contains the dataset we will use for the visualization.
    These two average scalars are not recorded during the simulation, we will have to compute them from the available data.
    The hop count is recorded at each node when a message arrives, so the mean of hop count will be available as a statistic. But this is recorded per node, and we're interested in the average of the mean hop count for all nodes. The 'Compute Scalar' dataset node can be used to compute scalar statistics from other scalars. We compute AvgHopCount as mean(**.'hopCount:stats:mean').
    We're also interested in the average number of packets that arrive at their destination. The count of the arrived packets is available at each node. We can compute their average, AvgNumPackets as mean('hopCount:stats:count').

    Then, we plot these two computed scalars against N in two scatter charts. The data for different repetitions is automatically averaged. Here is the average hop count vs N:
    The average hop count increases as the network gets larger, as packets travel more to reach their destination. The increase is polynomial. Notice that there are missing values at the far right of the chart. This is because in such a large network, some packets might not reach their destination in the simulation time limit. When no packets arrive at a node, the hop count statistic will be NaN (not a number) for that node. When there is a NaN in any mathematical expression, its result will be also NaN. Thus it takes just one node in all the simulation runs to have a NaN statistic, and the average will be NaN, and there'll be no data to display. This can be remedied by increasing the simulation time limit, so more packets have a chance to arrive.
    Below is the average number of packets that arrived vs N:
    Notice that the Y axis is logarithmic. The average number of packets that arrive decreases polynomially as N increases, and the network gets larger.

Congratulations!

  • You have successfully completed this tutorial! You have gained a good overview and the basic skills to work with OMNeT++, from writing simulations to analyzing results. To go to the next level, we recommend you to read the Simulation Manual and skim through the User Guide.
    Comments and suggestions regarding this tutorial will be very much appreciated.